Digital Ocean Simple Setup Guide
This guide is a walkthrough tutorial on setting up UH VPN on Digital Ocean. It contains step by step instructions on how to provision a private cloud server along with all the necessary steps on setting up UH VPN client applications.
The guide makes use of the “1 Click App” available on Digital Ocean to create servers for UH VPN as this provisioning technique allows an entire UH VPN deployment to be set up in less than 5 minutes!
Step 1: Create a Digital Ocean Droplet
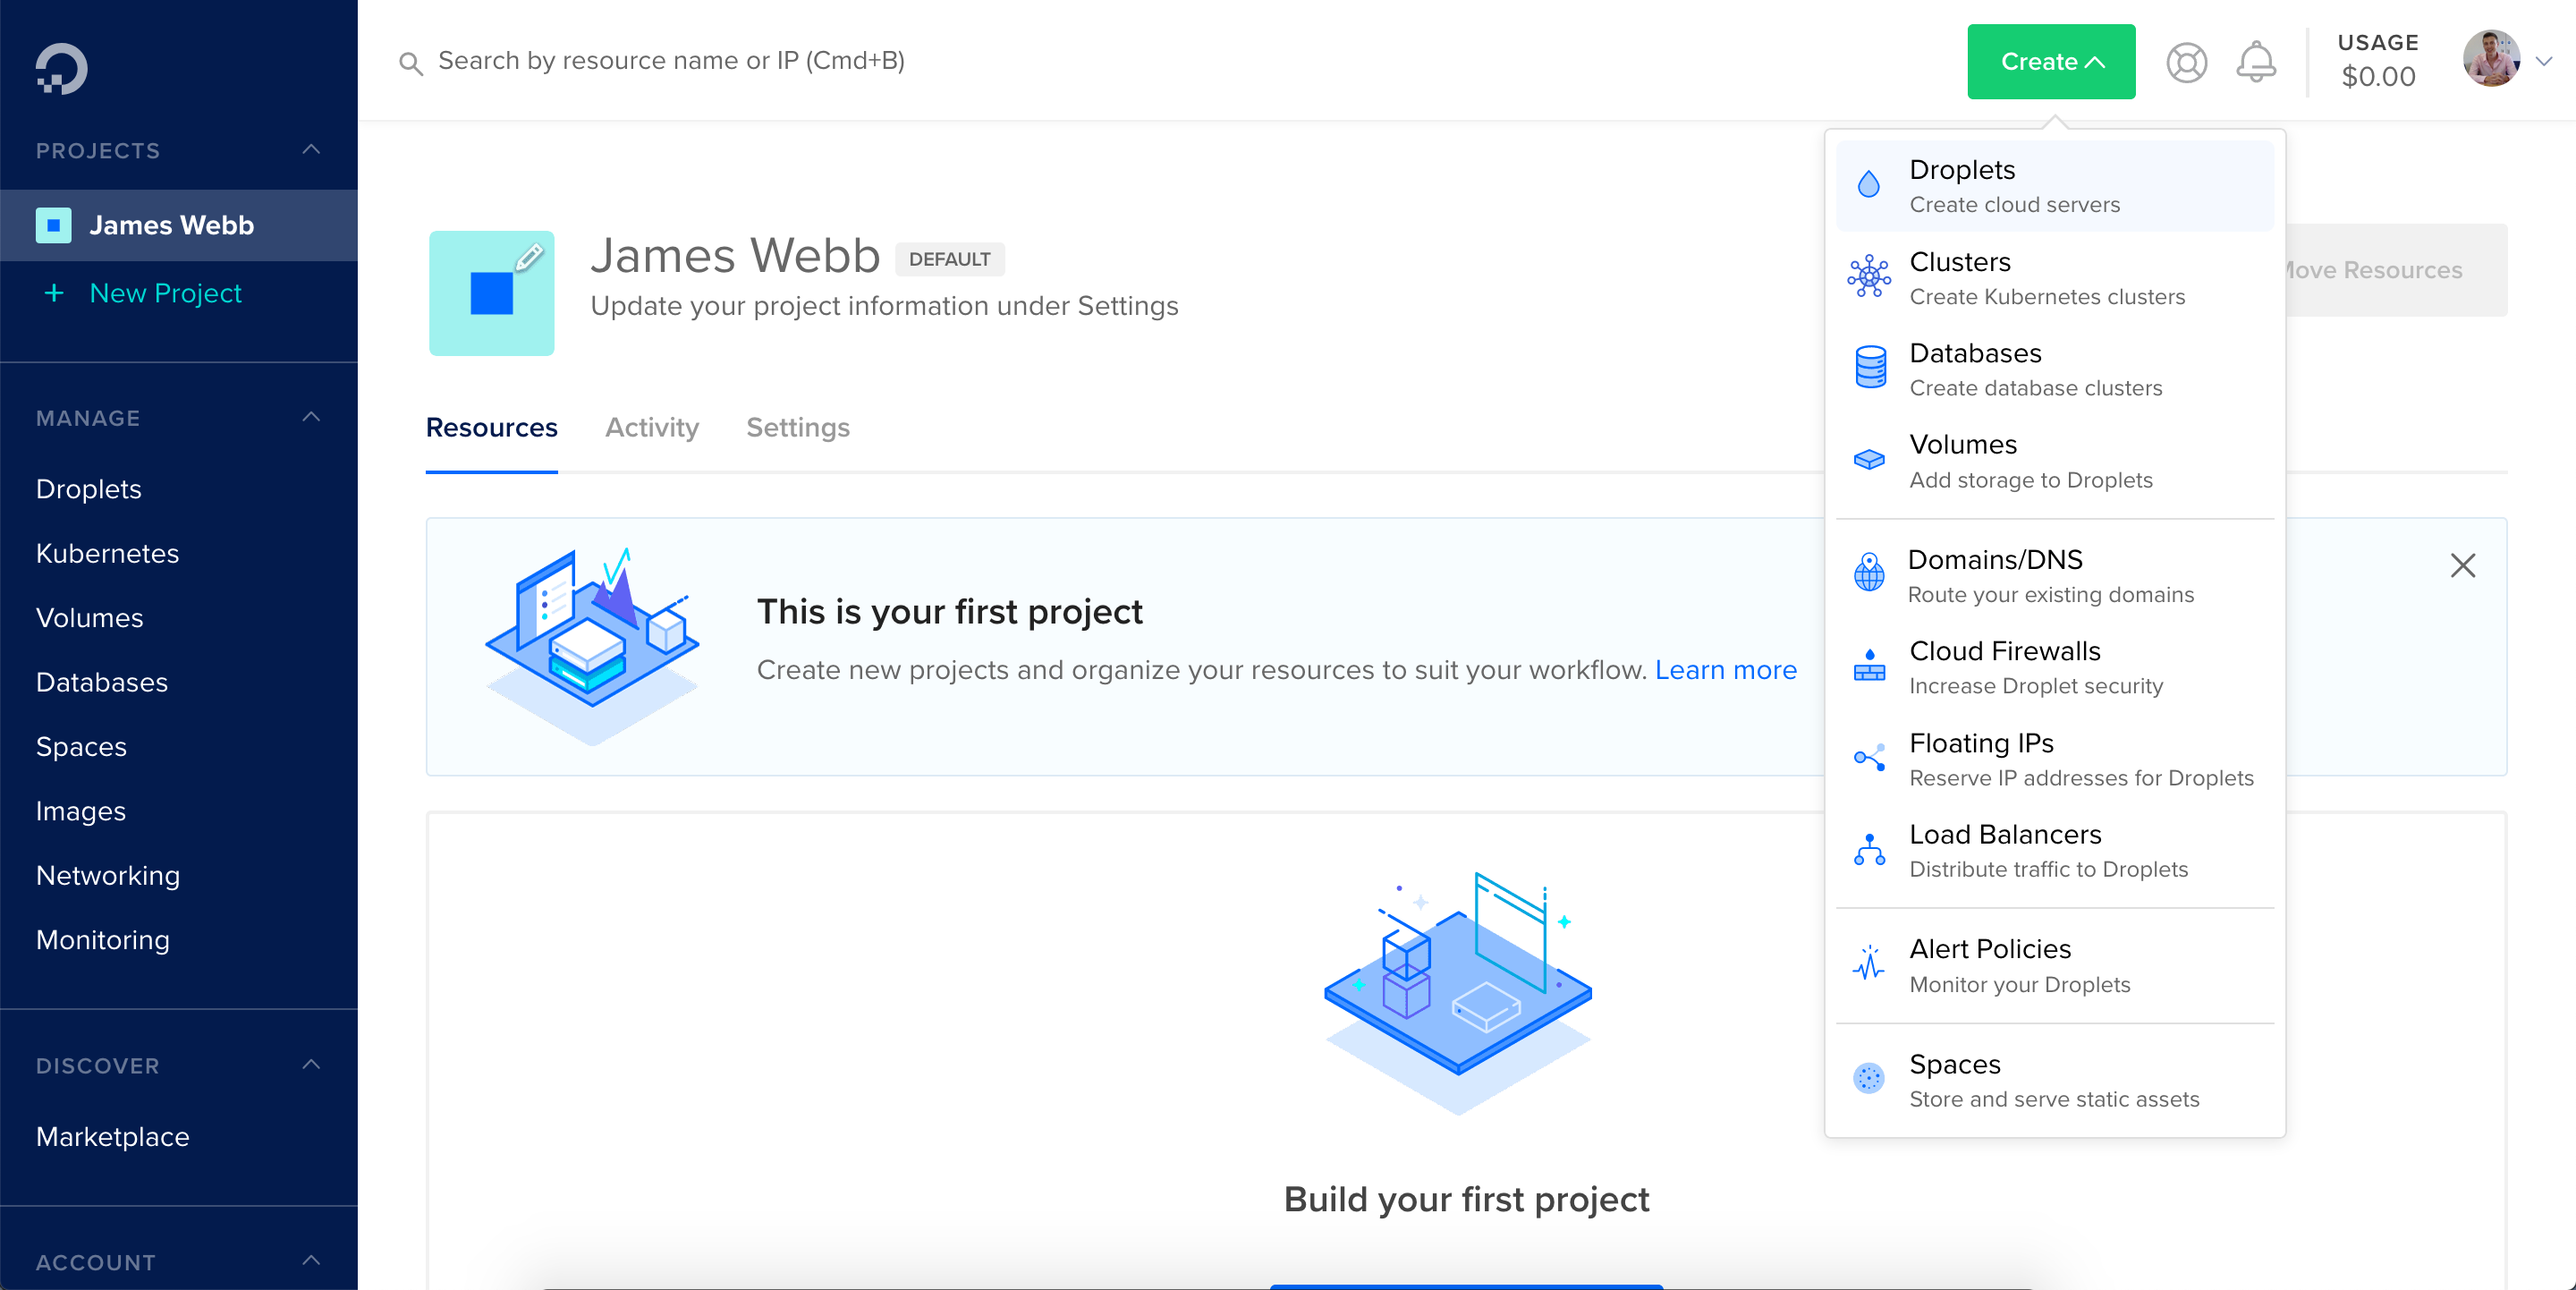
First create an account or login at: Digital Ocean. Then click the “Create Droplets” button as shown in the screenshot below:
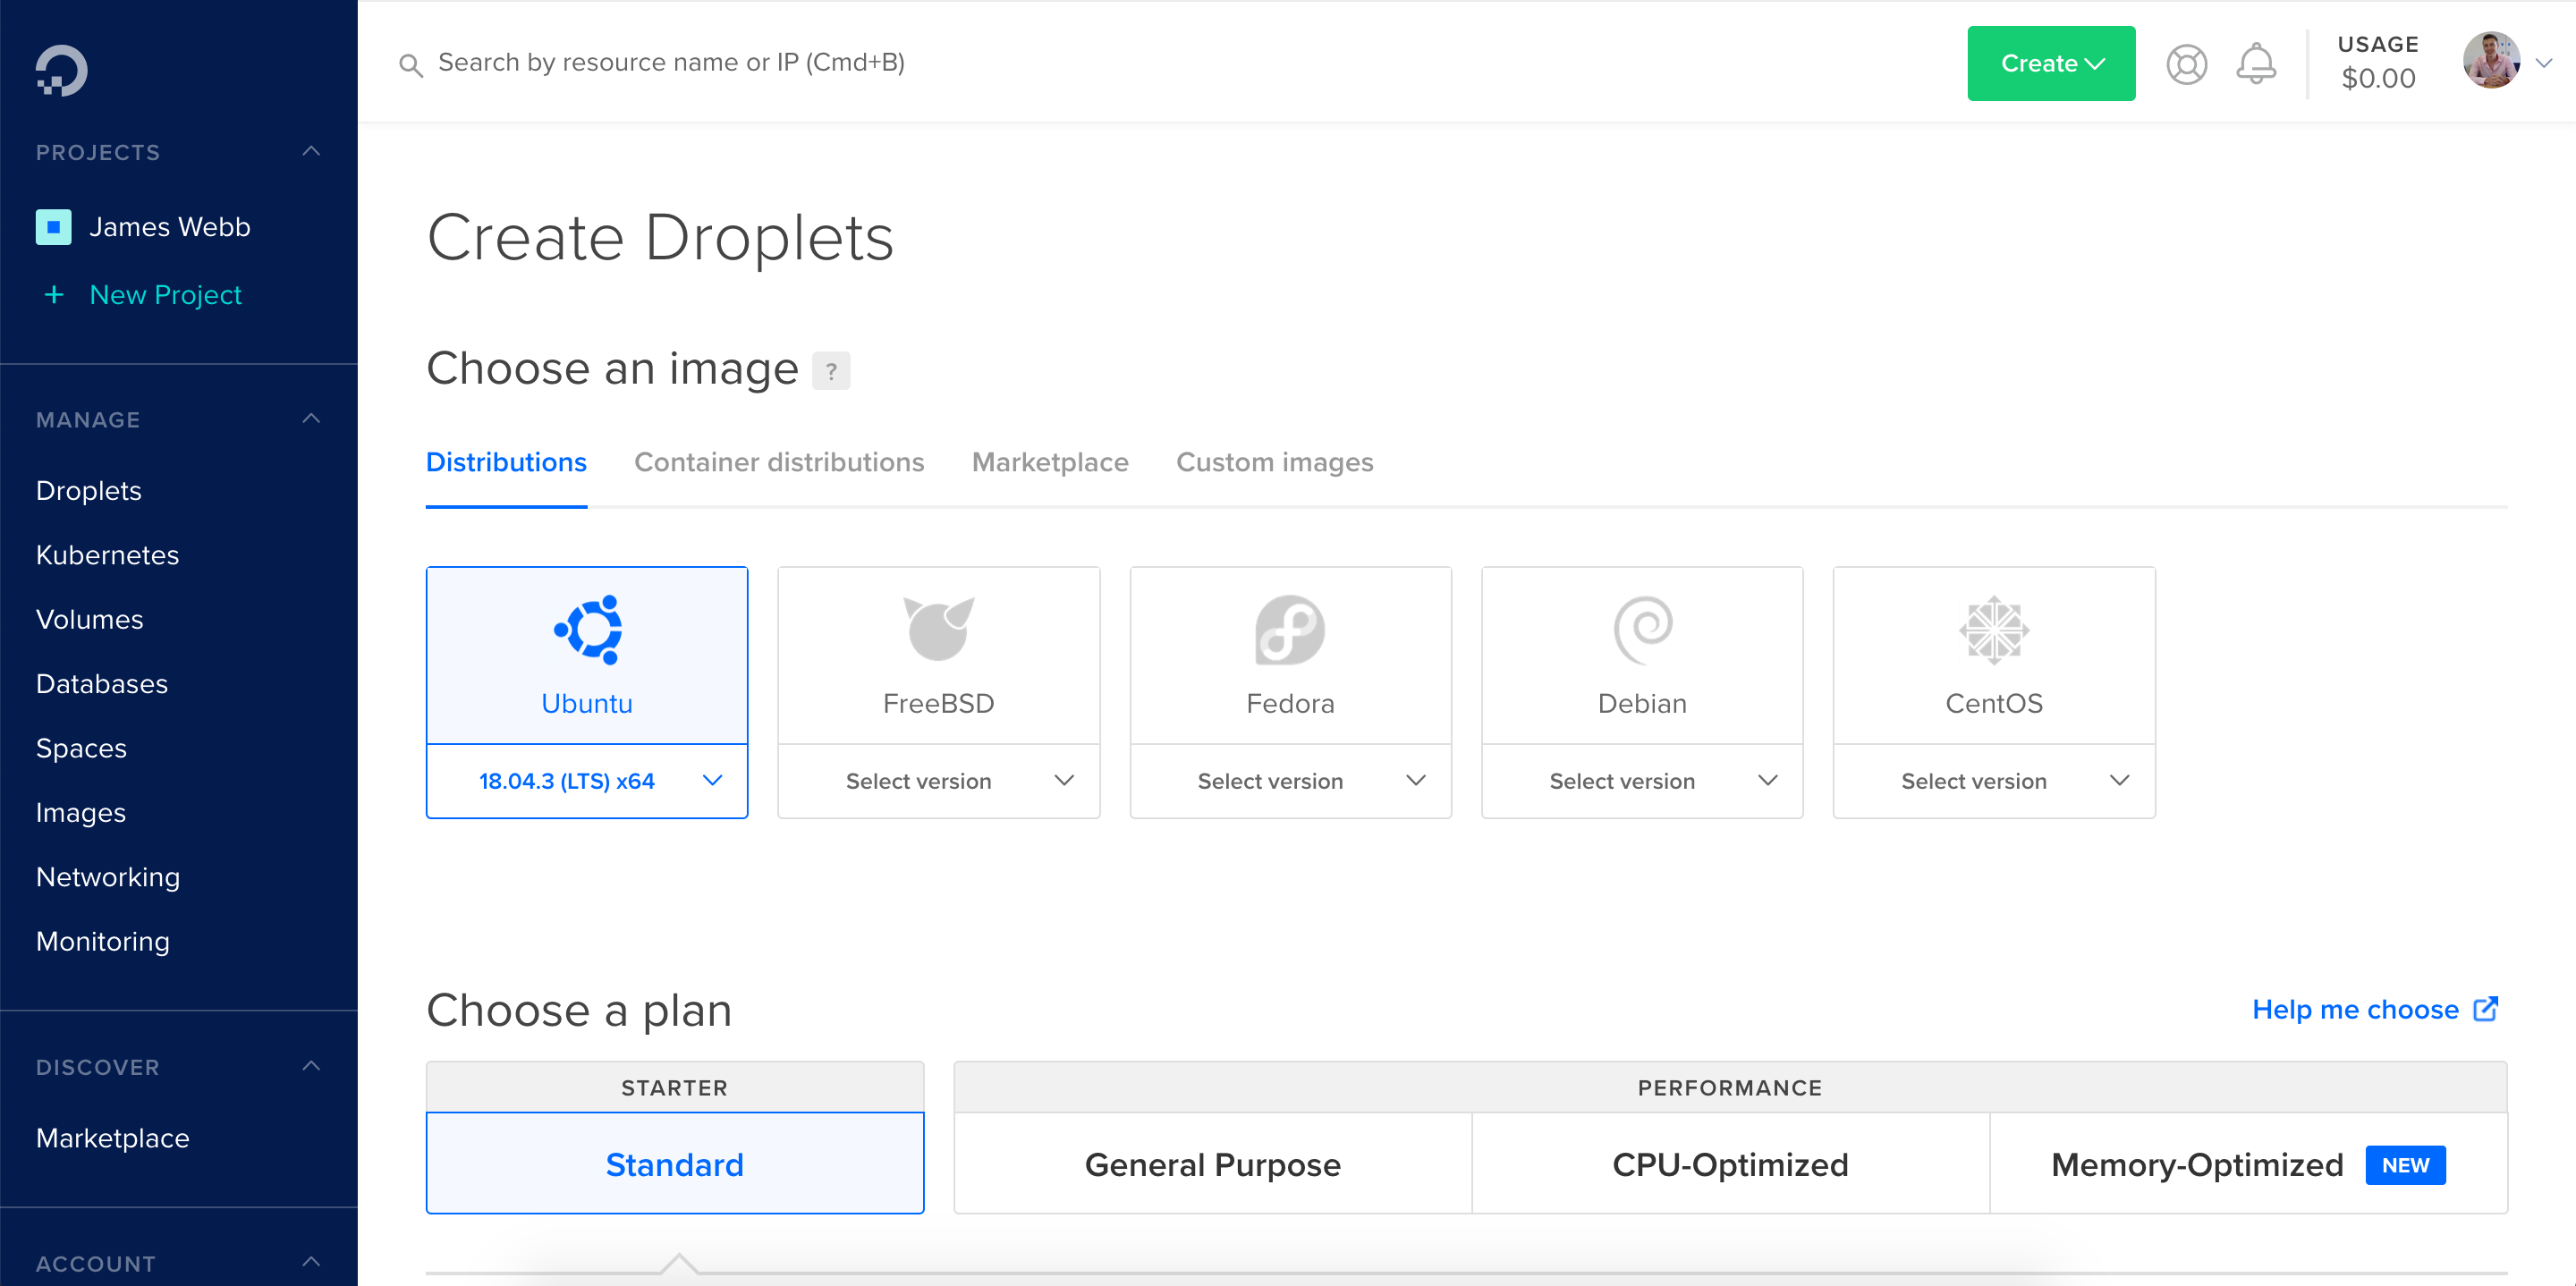
One is then presented with a droplet creation page as follows:
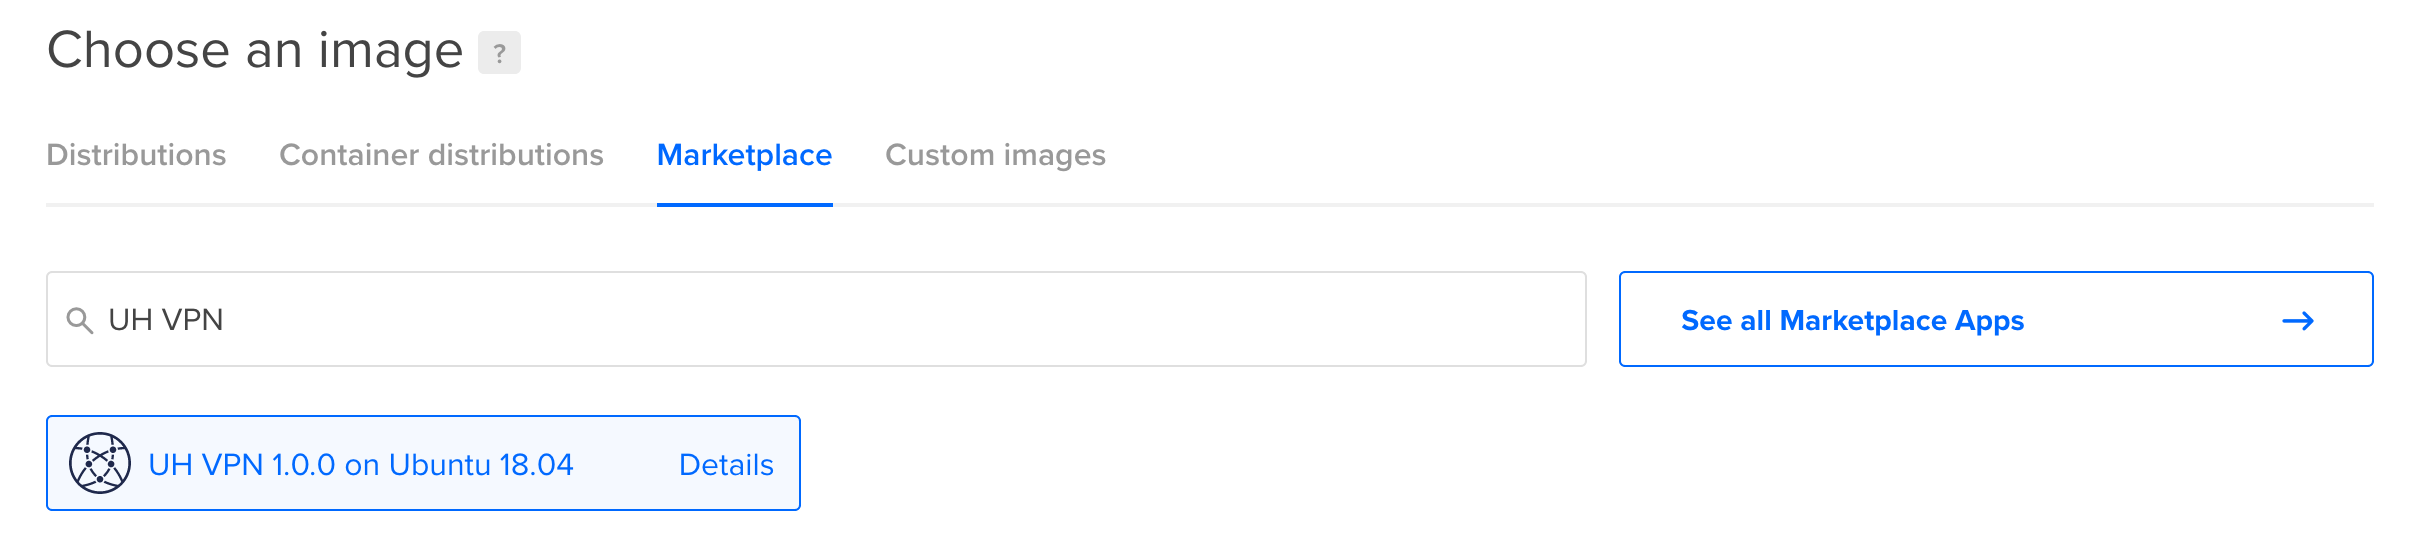
Press the “Marketplace” tab and search for “UH VPN”. Once selected, a UH VPN image will be chosen:
Ensure the settings are selected as shown below:
Plan : Standard
Price : $5 per month
Region : Choose location closest to you unless you have a specific requirement
VPC : No VPC
Additional Options : None
SSH Key : Select your SSH key.
Number of Droplets : 1
Hostname : Any friendly name you’d like to give to your server. E.g. “UH-VPN”.
Tags : None
Backups : None
Then press create! The droplet will then begin provisioning and a page similar to the one shown below will appear:
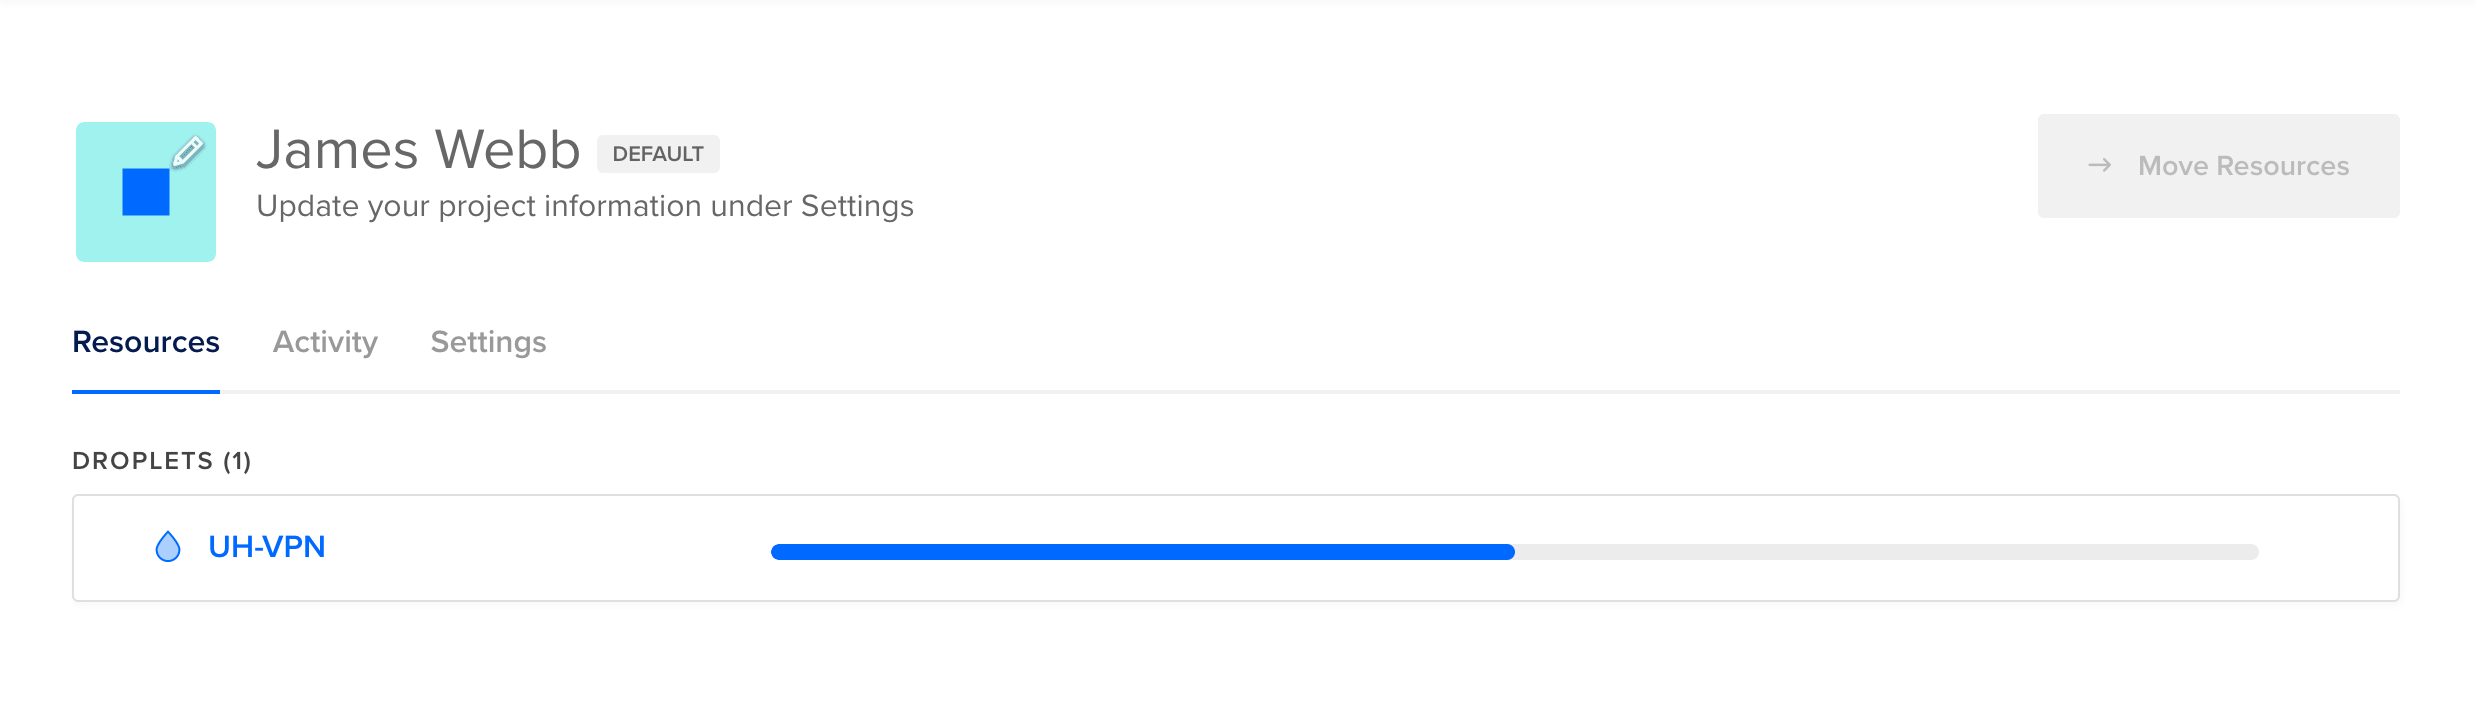
Once the provisioning stage has completed, click on the droplet and one will be presented with a page detailing all aspects of the droplet:
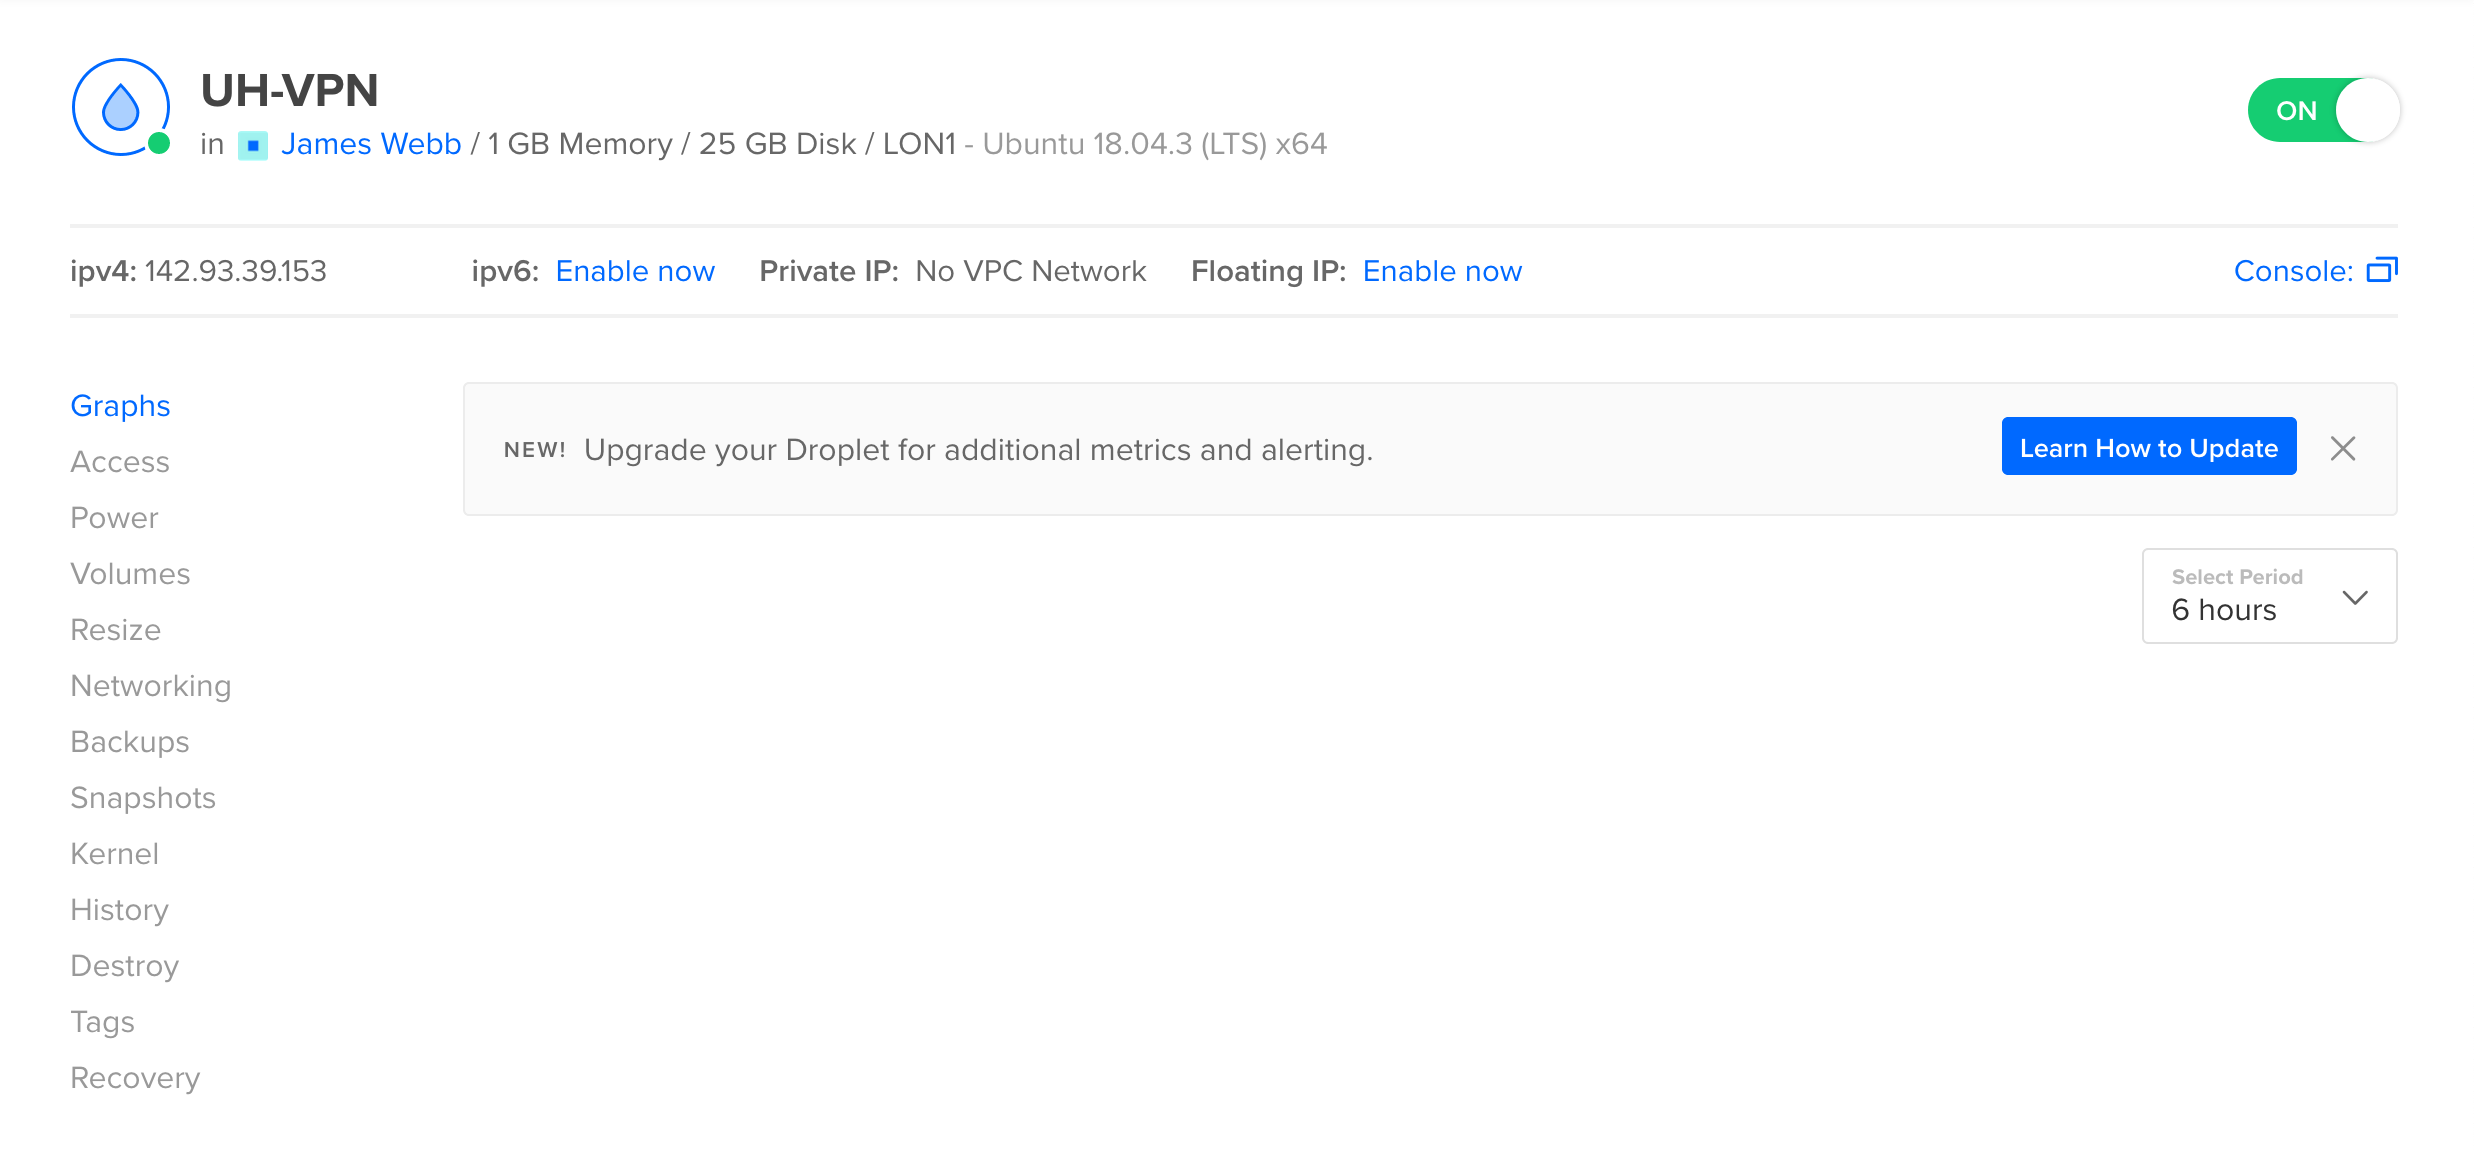
Note down the IPv4 address of the droplet as we’ll use this later on the UH VPN website. Then click the networking tab in the droplet overview page. Scroll to the bottom and under the firewalls section press the “Edit” button.
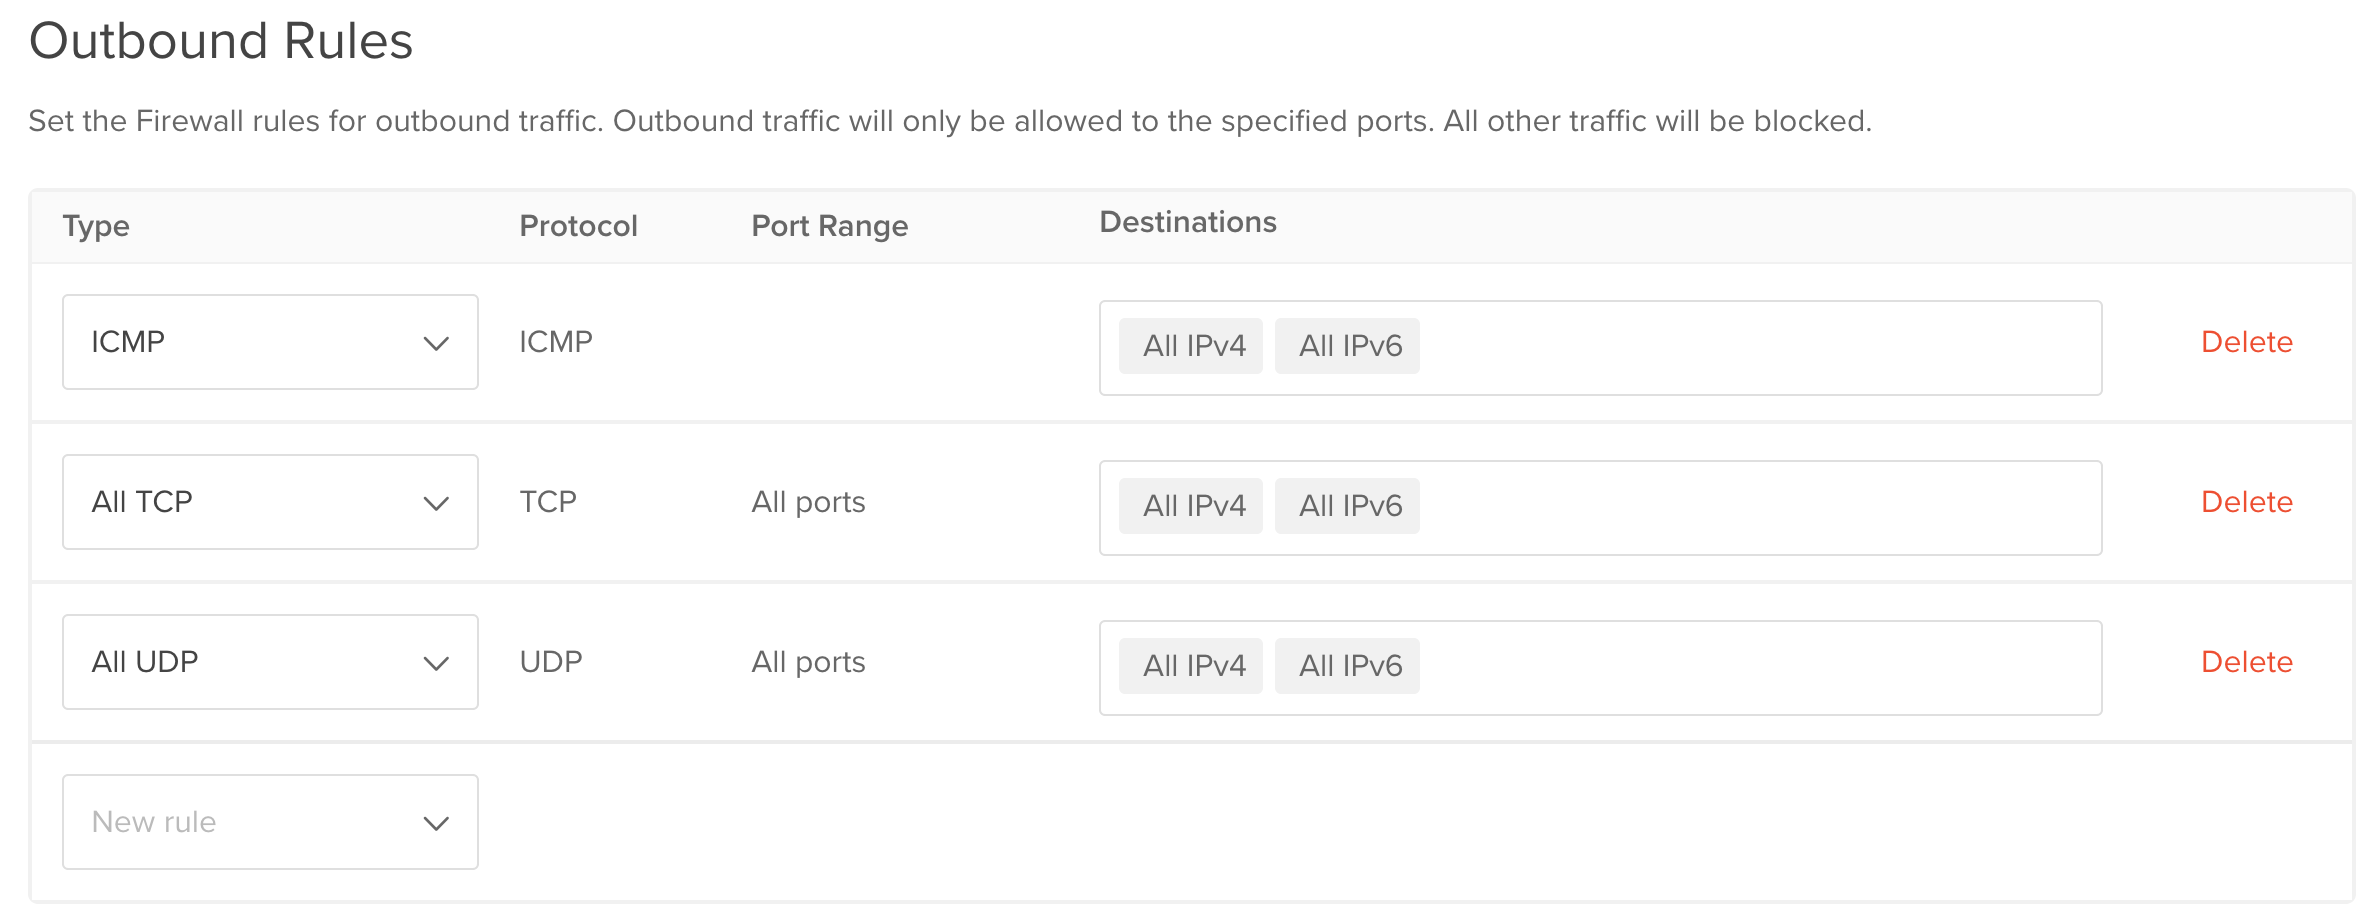
Press the create button, choose a name for the firewall E.g. UH-VPN-Firewall, then ensure the rules are defined to match the specification below:

Finally, ensure the firewall is associated to the droplet you created earlier. E.g. UH-VPN. Then press “Create Firewall”. The Droplet is now firewalled against adversaries and ready for UH VPN.
Note
TCP 2802 must be open on the inbound firewall rules as this is used by the UH VPN API to push server config updates.
Step 2: Create a Server on the UH VPN Website
The UH VPN website is the command and control centre for the VPN deployment. All VPN settings are managed through this interface. The first step (if you haven’t done so already) is to create an account. Then once logged in, click the management tab and then press the “Create New Group” button. One is then presented with the following page:
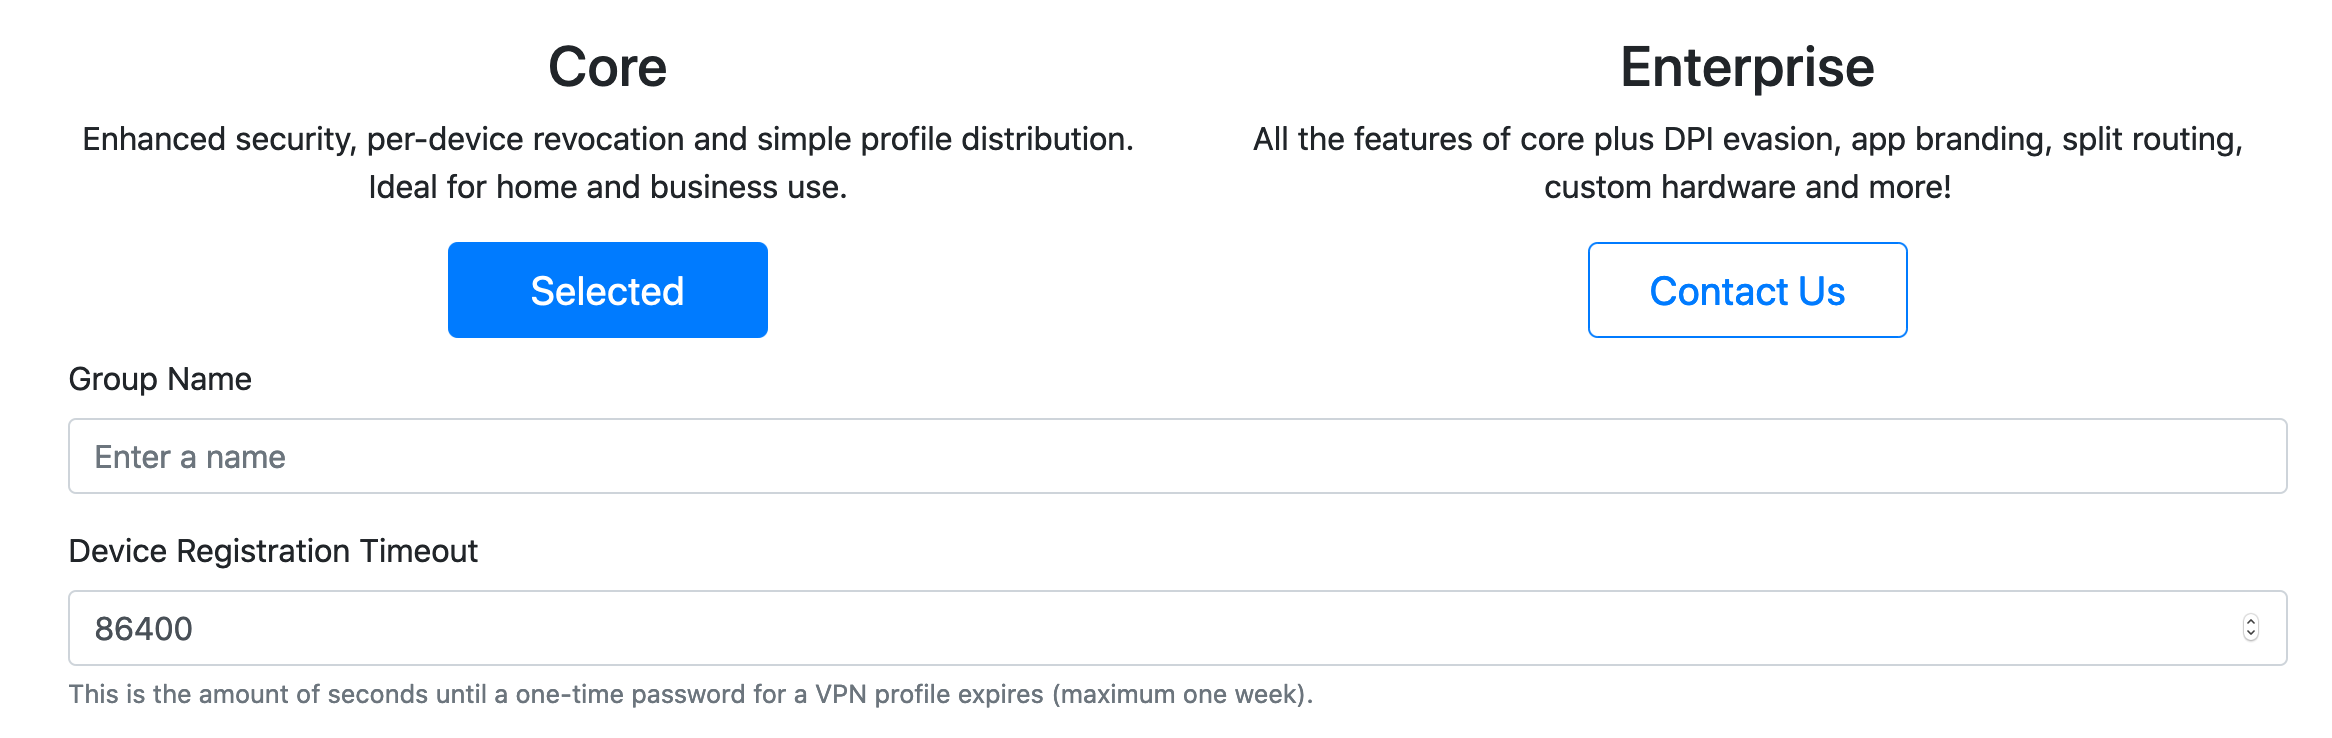
The core plan is ideal for almost all users. However, companies wishing to resell VPN services or utilise UH VPN on censored networks may wish to consider the enterprise plan. A breakdown of the options can be seen on the Creating Groups docs page. The core licence is billed monthly at the rate of £4 per device.
Choose an appropriate name for the group E.g. Personal and then leave the timeout set at 86400. Then fill in the appropriate billing information and press the “Submit” button then the group will be created.
Click on the group name that has just been created and the following page will be presented:
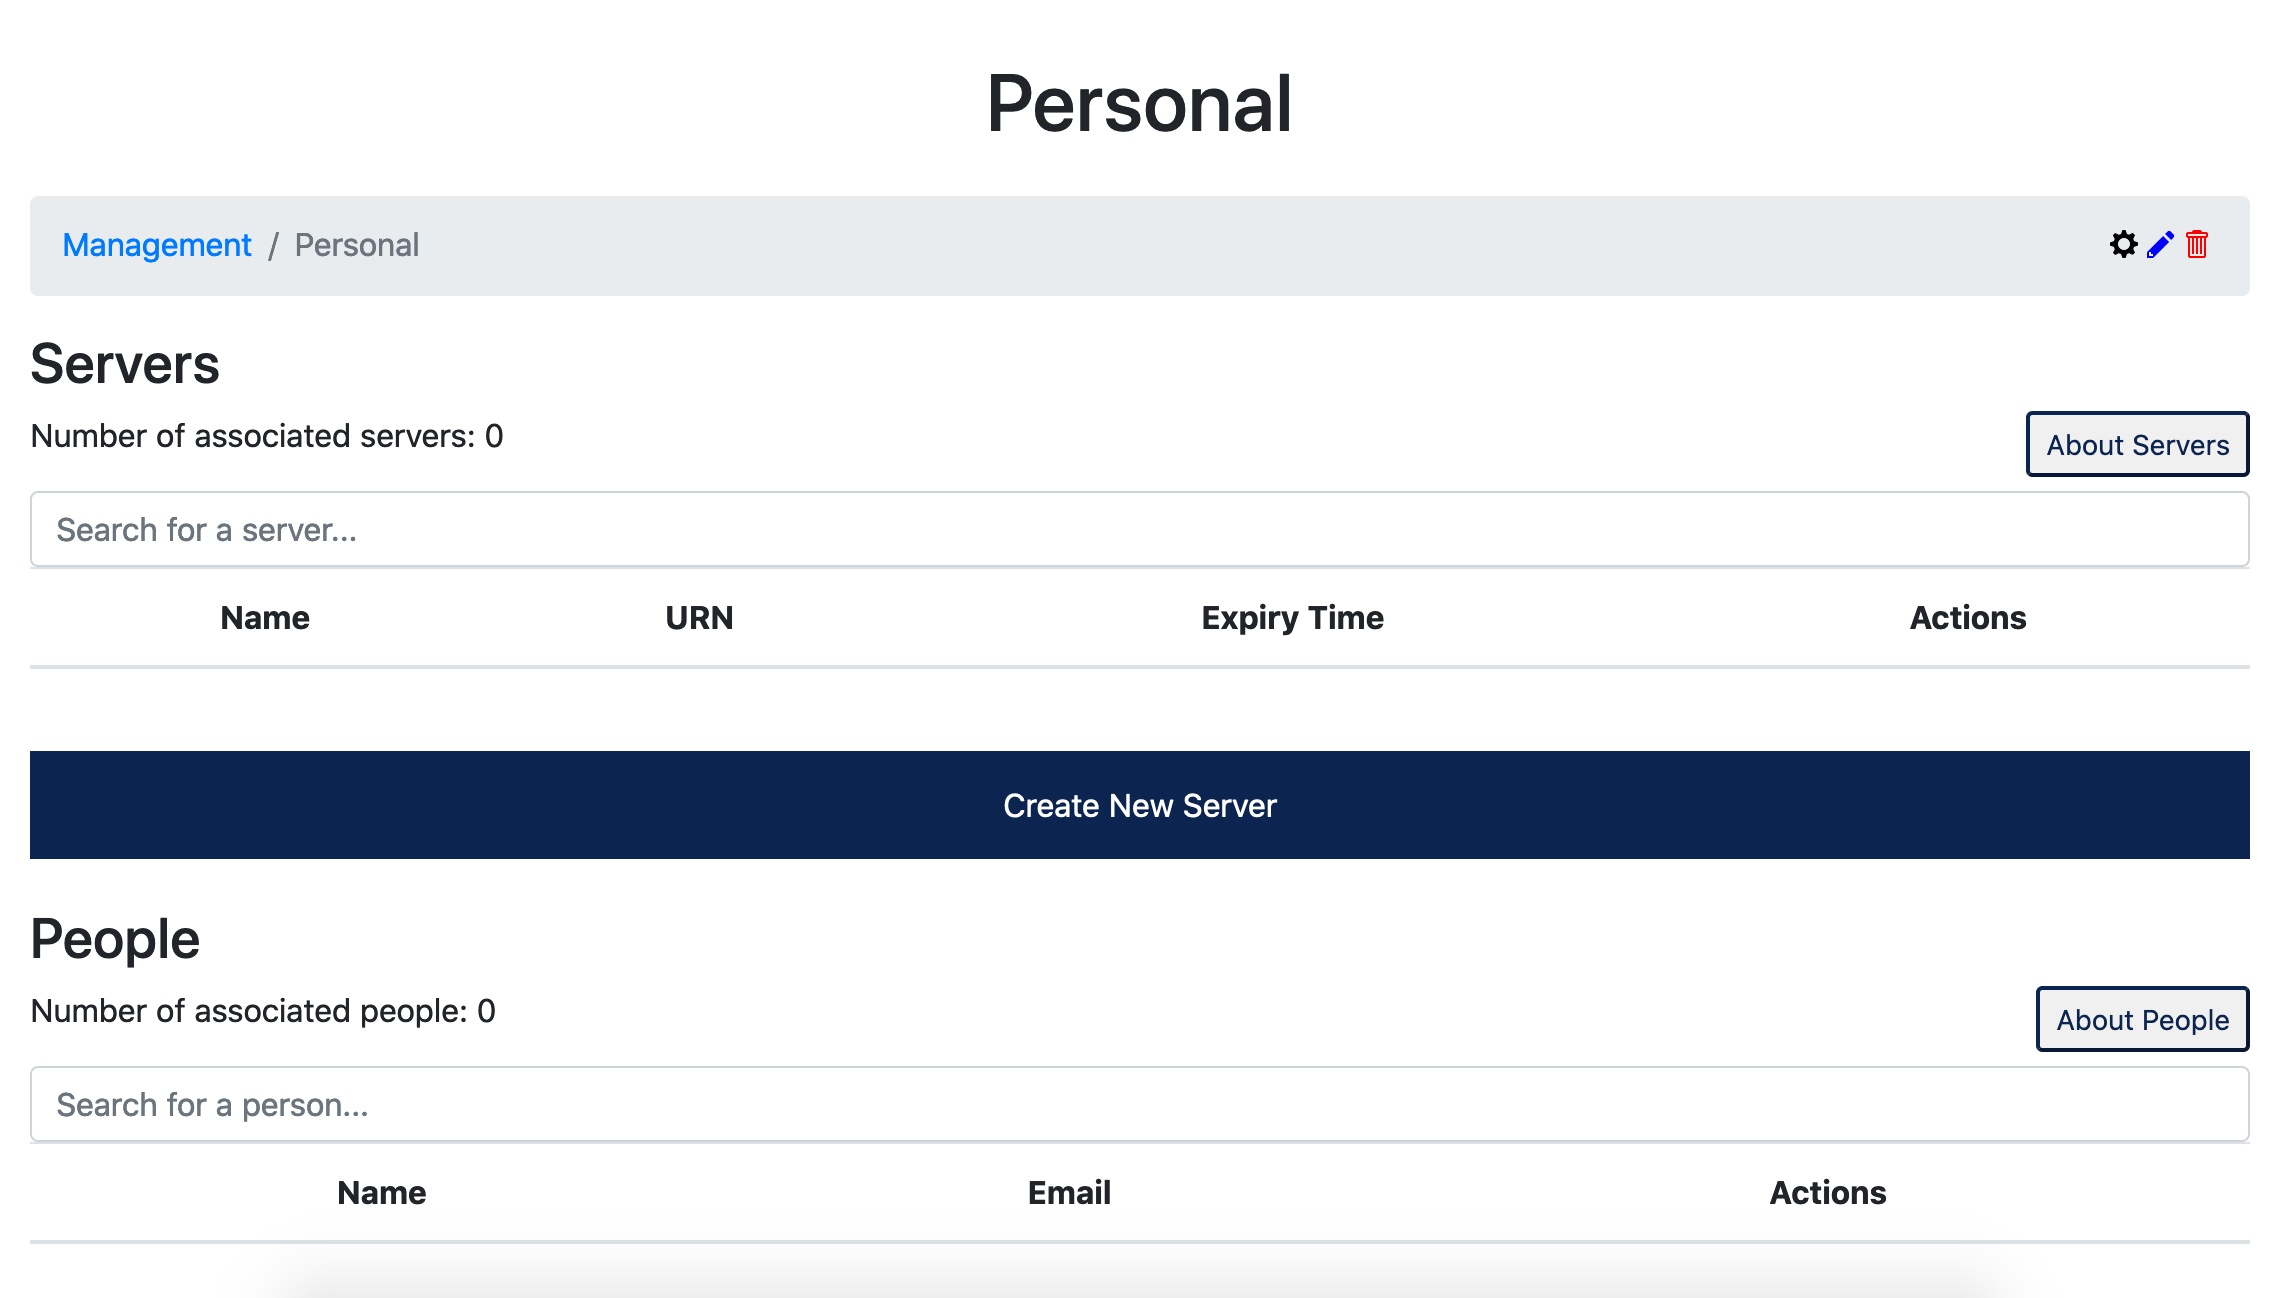
The first step is to create a UH VPN server, click the “Create New Server” button and the following page will be presented:
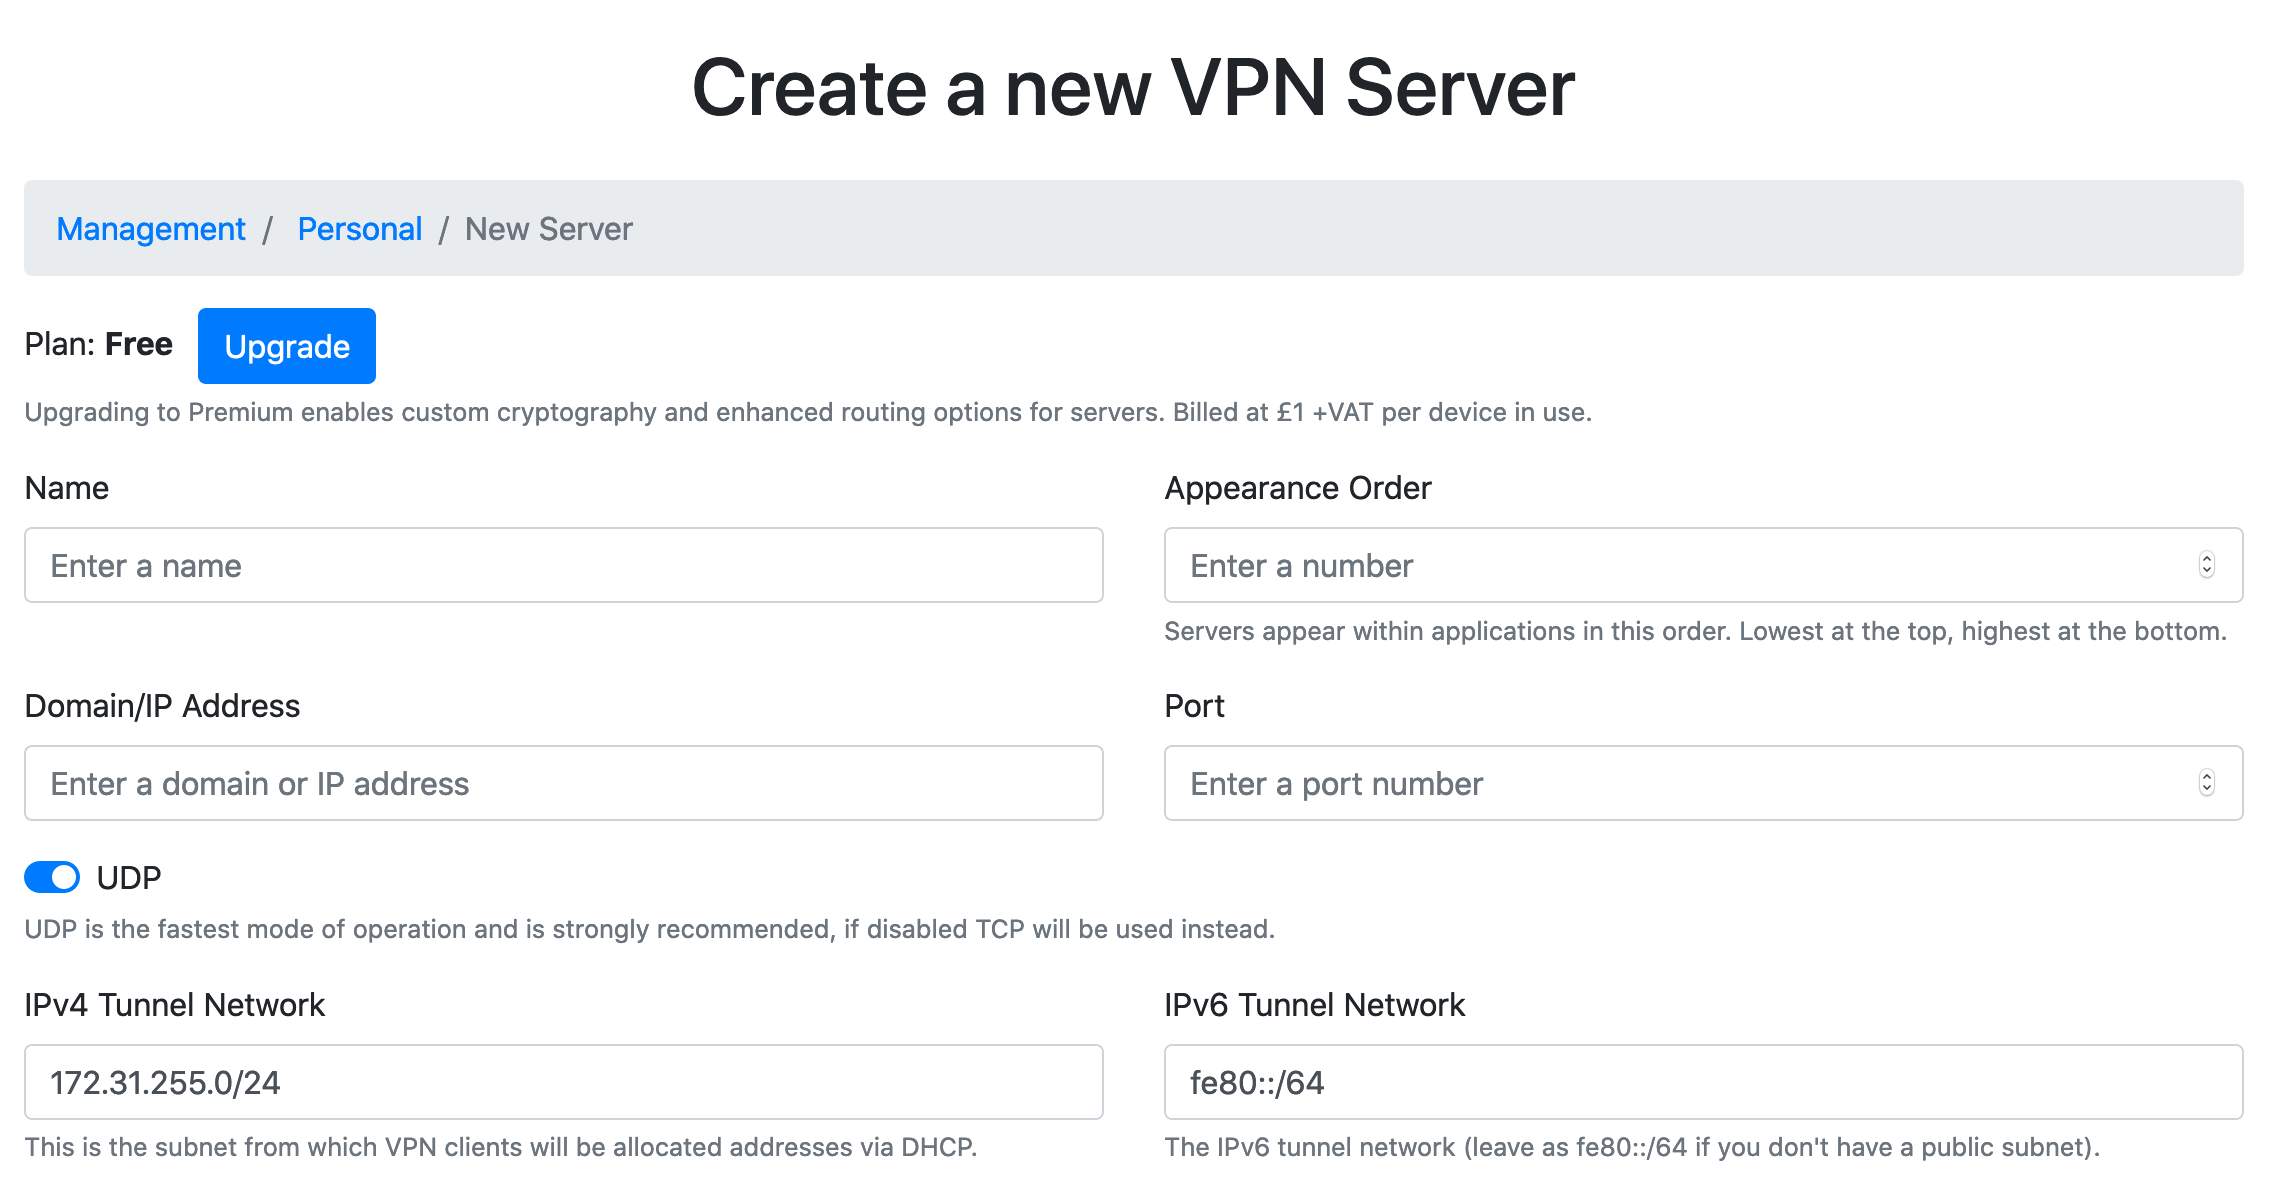
Enter the following parameters:
Name : UDP
Appearance Order : 0
Domain/IP Address : IPv4 Address noted from the Digital Ocean droplet earlier
Port : 443
UDP : Enabled
IPv4 Tunnel Network : 172.31.255.0/24
IPv6 Tunnel Network : fe80::/64
DNS Servers : 1.1.1.1, 1.0.0.1
Add Forwarding Rule : Enabled
Add NAT Rule : Enabled
Press submit and the server will then be created.
Note
A full description of all parameters can be found on the server creation docs page.
Once created, press the  icon to obtain a UH VPN API token for the server. Copy
and paste this to somewhere safe as it’ll be used later.
icon to obtain a UH VPN API token for the server. Copy
and paste this to somewhere safe as it’ll be used later.
Step 3: Configuring the Droplet
Login to the newly created droplet via SSH using the username “root”. Once logged in, a UH VPN setup script will appear:
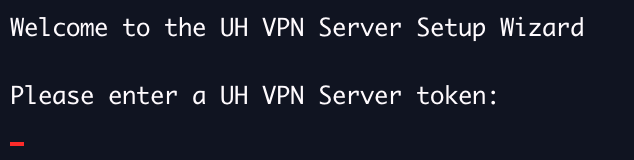
Simply paste the UH VPN API token obtained in step 2 into the prompt and press Enter:

Only one token is going to be added as we only wish to associate one server to this droplet, so answer with “n”:
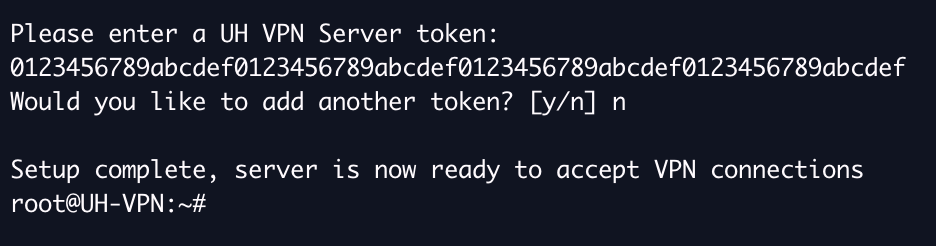
The droplet is now successfully configured and ready to accept UH VPN connections!
Step 4: Installing Client Apps
This is the final step in the set up process. First login to the UH VPN website and navigate to the group you created earlier. Now it’s time to make a new person who’s authorised to access the VPN server you just created. Click the “Create New Person” button and the following page will be presented:
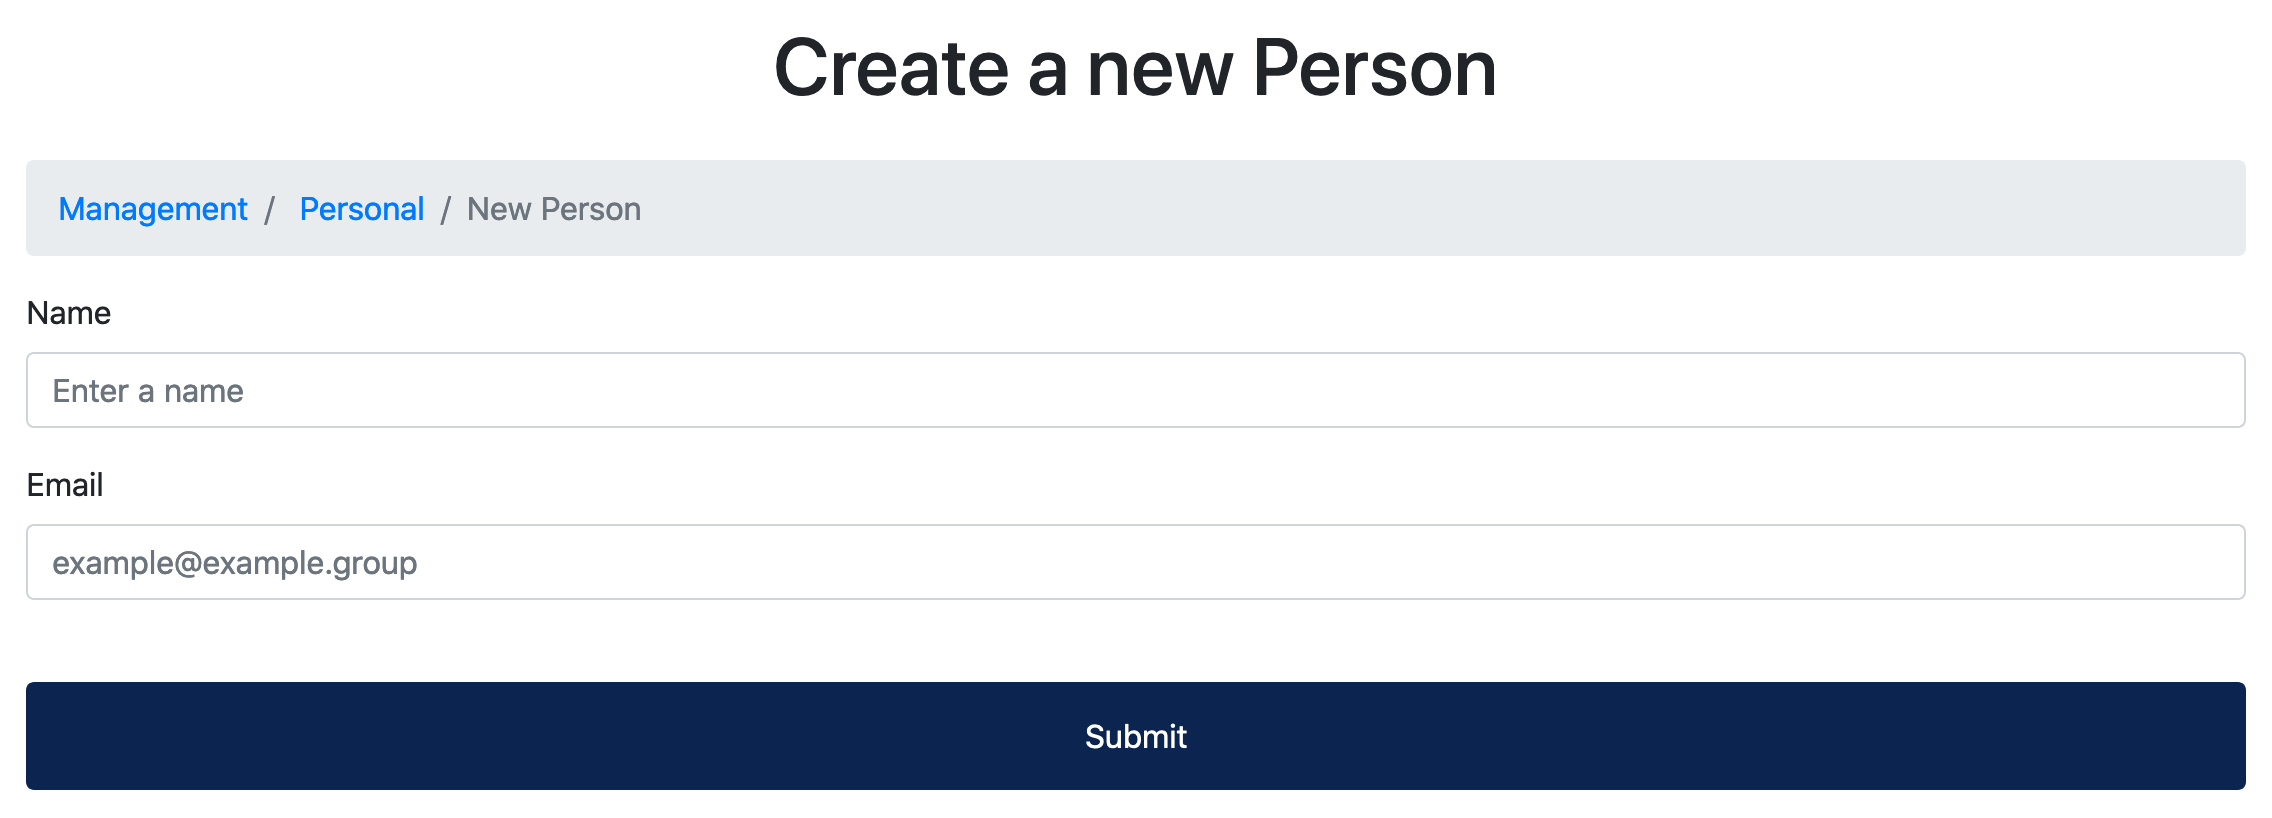
Enter your name and email address, then press submit and the person will then be created.
Next it’s time to associate a device to the person that’s just been created. To do so, click the name of the person and then press the “Add new device” button and the following page will be presented:
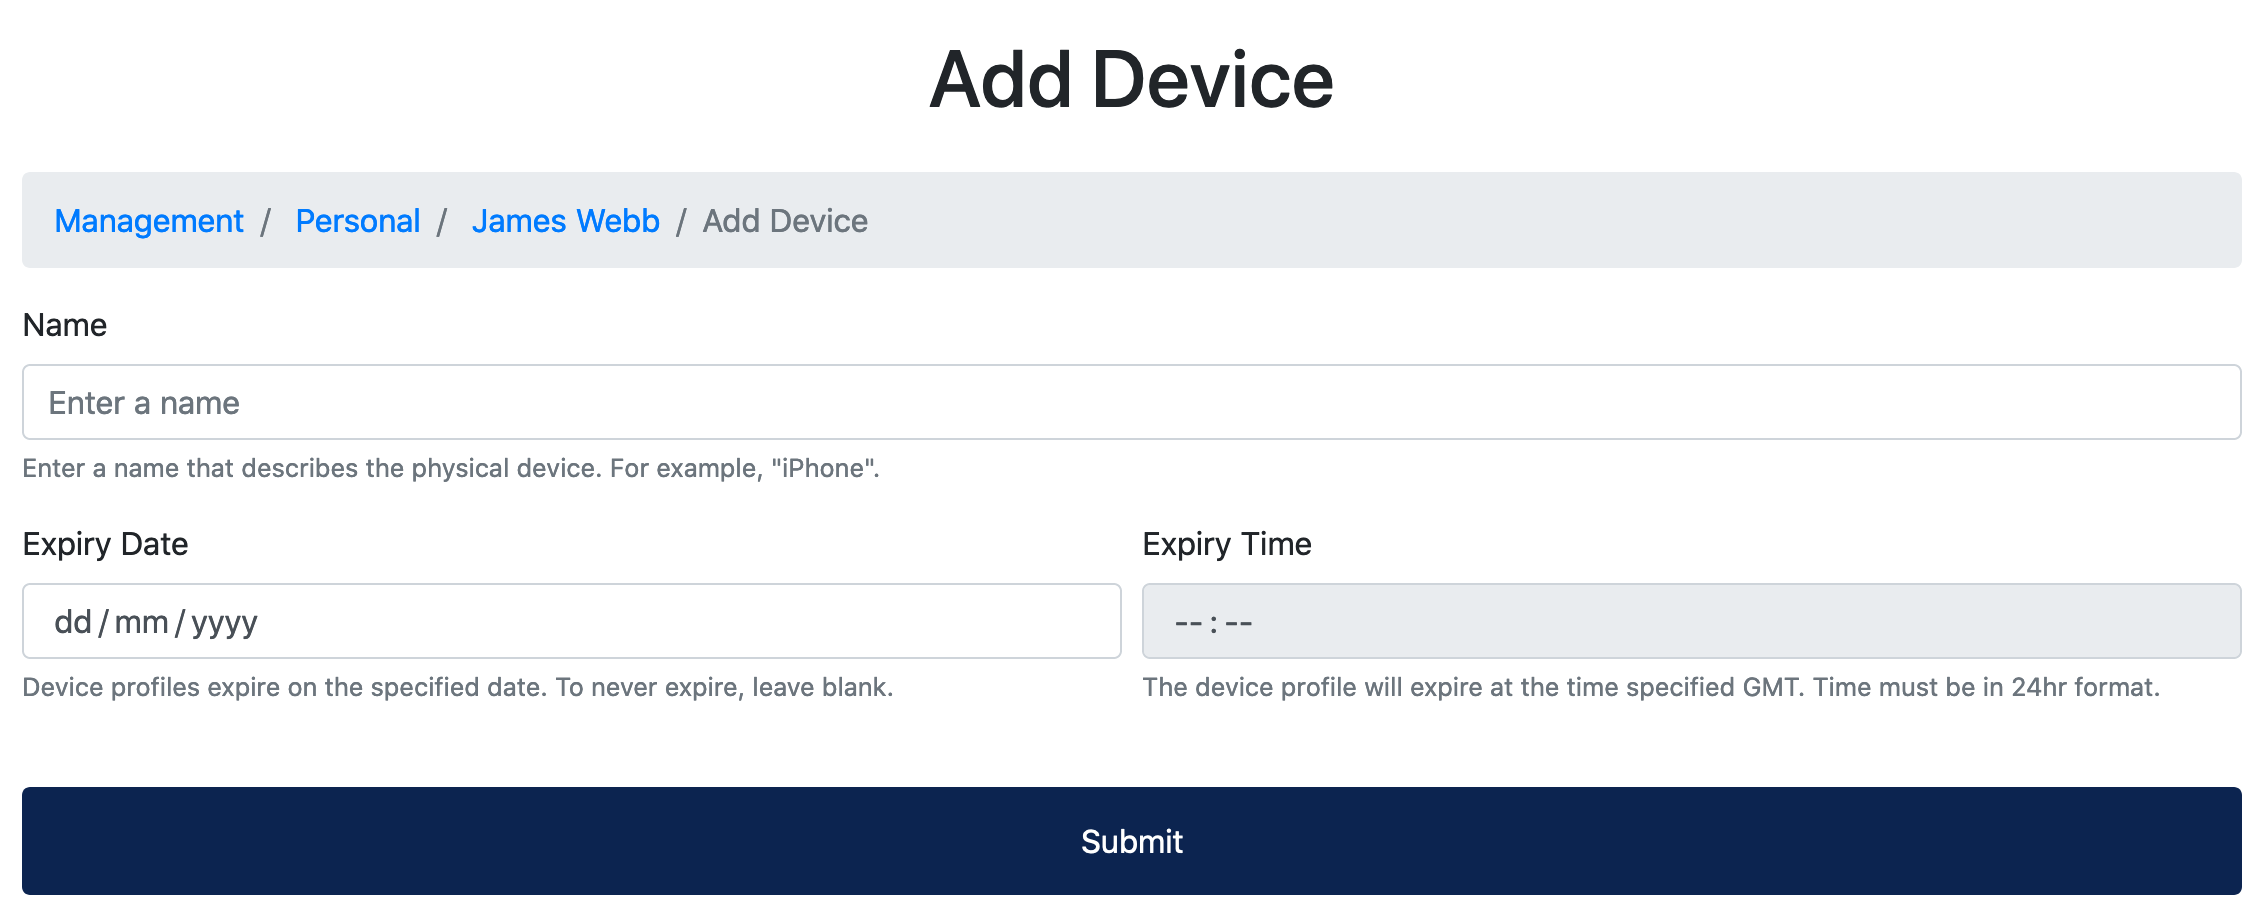
Enter the following parameters:
Name : A name for the device. E.g. Android
Expiry Date : Leave unfilled unless you wish to specify a date for device revocation
Expiry Time : Leave unfilled unless you wish to specify a time for device revocation
Note
A full description of all parameters can be found on the device creation docs page.
Press submit and the device will then be created. You will then receive an email with a one-time passcode (OTP). Download the UH VPN app for your platform and enter the OTP code to download the profile. Then you can connect and enjoy a fast, secure and private VPN connection!
Tip
Instructions for client apps can be found on the clients docs page.
Advanced Digital Ocean Guides
This section is purely optional and is aimed at those wishing to integrate UH VPN Droplets with advanced features of Digital Ocean. If you don’t have a specific need for one of these guides, then please ignore.